Monday, August 27, 2012

Oven-Dried Tomatoes

Sun Dried Tomatoes are delicious, but the sun here in Vancouver is not very hot, or reliable. And so, last year, when my tomatoes ripened, I decided to oven dry them instead.
The variety I grew was called Principe Bourghese, a small variety meant for drying, they were like mini paste tomatoes, with lots of flesh and less seeds. My thyme plant was huge too, so I harvested both.
After washing them and removing the green stems, I cut each one in half and lay them out on a cookie sheet with the thyme and olive oil.
Then I put them in the oven, set at 250 degrees F for almost 4 to 6 hours. I would check on them every hour for the first 2 or 3, and then every 20 minutes after that. Your house will smell amazing.


Once they are ready, put them in a jar and cover them in oil. They will be good for about a month in the fridge, and after they are done, the oil can be used as a lovely flavouring too.

Tuesday, August 21, 2012

A Honey CSA

Bees are selfless and hardworking, they turn pollen into honey and wax, while pollinating 40% of the planet's food in the process. They are completely dedicated to the hive, feeding the queen, caring for the young and foraging for flowers, and will quickly give up their lives if they feel that their hive is threatened.
And yet, they are all threatened, and by extension, all the services they provide for us and all the creatures in the food web are also threatened. They simply are not finding our current agricultural system to be tolerable, the mass migrations that the factory bee keepers submit them to, the new and alarmingly potent pesticides, and the vast monocultures, have left them weak. And hosts of parasitic, bacterial and viral infections have found footholds. So, their populations are collapsing.
I've been aware of this phenomenon for several years (it is no secret, all the major news outlets have said something about it.) And so, I jumped at the chance to support a beekeeper who was trying to really keep the bees.
His name is Brian Campbell, of Blessed Bee Farm and on top of having an impressive resume of being a founding member of the Richmond Sharing Farm he is also a skilled and passionate bee keeper and teacher. He defines keeping bees ethically by not exposing the bees to chemicals and not force migrating them around the continent. Also, by making sure that the bees come first, by only harvesting the extra honey, so that they have enough honey to overwinter, so they won't need to be fed high fructose corn syrup, like, unfortunately, most honey bees are.
I got to cross paths with him through a Honey CSA that he offered in the spring.
CSA stands for Community Supported Agriculture, and the idea is that emerging, small farmers reach out to the community for support in start up costs. So a consumer would purchase a share at the beginning of the season, and then get a percentage of the harvest when it comes in. It means that the consumer carries the risk (and it is a risk, my friend joined one, and then the farm was flooded, meaning she will only receive a fraction of what she was hoping for.) But, the farmer, or producer won't lose their shirt or farm if the year turns out to be terrible. This way we can continue to have small farms, and farmers can continue to stay in business while they partake in the learning curve required to transition to organic farming, or just farming in general, in the case of many young farmers.
I was very excited to join the Honey CSA, especially since I've been so interested/intimidated by beekeeping, and I knew one share included a hands on demonstration of the honey harvest.
The hives for the CSA were kept in a grove of Hazelnut trees, on the edge of Terra Nova, one of Richmond's sharing farms. It was amazing to open up the hives, though I was also very nervous. It was hot, and bees were buzzing around everywhere, it felt a little claustrophobic at times. Luckily, I did not get stung, but a few people did, and poor Brian got stung up his nose...
However, everyone was just entranced by the bees. The buzzing, the intoxicating smell of honey, and the intricate and precise shapes of their honey comb held us all transfixed. The image above is of a super, the bees have built their comb in the frame and have filled up mostly every cell with honey, so this super is very heavy.
The honey filled supers get removed from the hive, put into a sealed box and taken into a sealed room (the smell of their honey outside the hive will make the bees aggressive) where the harvest is to take place.
First the wax tops of every cell must be removed with a honey comb. It takes a lot of energy for bees to make wax, for every 8 ounces of honey a hive will produce only one ounce of wax, and the wax is very valuable to them for comb building, so we saved it and it was given back to the bees to use again.
Then, after the wax seals have been removed, the super is loaded into the extracting machine.
Once the extracting machine is fully loaded it get turns on, and it spins the supers around very fast. This spinning allows centrifugal force to remove the honey from every cell, splashing it on the inside of the walls, where it drips down to the bottom of the extractor, and pours out the spout.
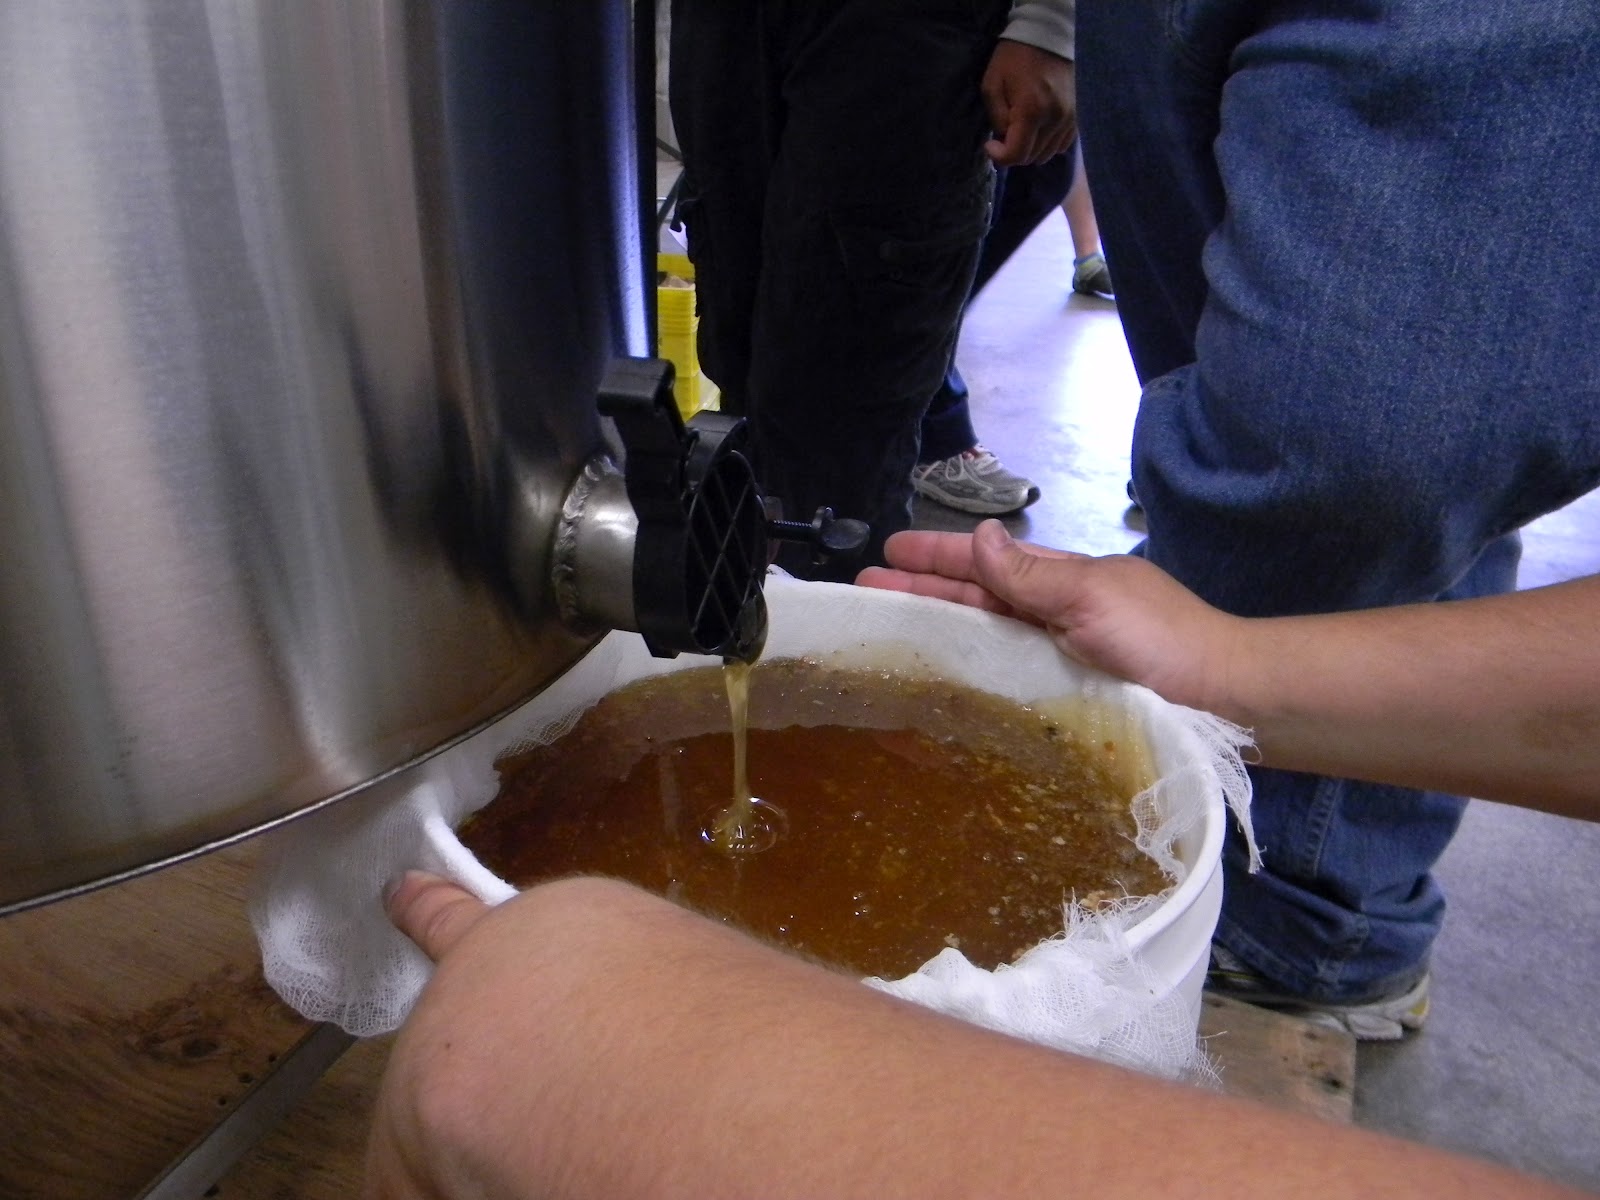
The honey is mixed with wax fragments, so filtering it through cheese cloth is important.
Then it  is ready to be bottled. We had to wipe the lip of the jar, before putting the cap on, similar to when you are canning jam.
So lovely, unpasteurized honey, still warm from the hive. Mmmmm.

If you want to learn more about bees, please, do not hesitate. Watch the documentary Queen of the Sun a poetic, romantic, factual and riveting documentary, or read Keeping The Bees by Laurence Packer, a well written book that caters to those with scientific leanings, but is an entertaining read as well.

At the end of Queen of the Sun there are 6 things listed that we can all do to help out honey bees. I repeat them here because I think they are so important to know.

How To Help Honeybees

1. Grow flowers, plants and herbs to help provide food for bees.

2. Eliminate pesticides in your garden and lawn.

3. Bees are thirsty. Provide a continuous shallow basin with clean water in your garden.

4. Buy directly from a local beekeeper who avoids using chemicals and produces raw honey.

5. Eat organic and pesticide free food.

6. Become a Beekeeper with sustainable practices.


Tuesday, August 14, 2012

Low-Tech Latte


I live in a household with two coffee fanatics, however I find coffee too bitter on its own, and need to have it really milky to enjoy. Doubly so with espresso from our stove top espresso maker. 


As I am the only one in the house not connoisseur enough to enjoy my espresso black, I've developed a little method for foaming my milk that doesn't involve buying a new gadget. I simply heat my milk on the stove....


 Pour it into the ubiquitous mason jar.


Shake like mad, pour in into the mugs and spoon out the foam. It works great. It does create a few dishes, but those are so much easier to do once you've had your latte.

As an aside, I recently learned that if you are ever in Italy, don't order a latte if you want a cafe latte, or you will just get milk. 

Enjoy!

Tuesday, August 7, 2012

Garlic Braids!

The garlic mostly dried, and I got another chance to practice making garlic braids. It is easier to do with soft neck varieties, than with hard necked garlic, but I like eating garlic scapes, so most of my garlic is hard neck. To braid hard neck you need to break the neck or hard stem of the garlic, all along the stem, all the way to the leaves. Then you will need a lot of patience to braid them, starting with three and feeding bulbs and their stems into the braid as you work....
It's worth it, I think, they look beautiful, I had to display them over our table.
We have very little space, so storing our year supply of garlic in this way is not only fun and functional, it also agrees with my desires to reflect the seasons in my home and, especially, kitchen.


Tuesday, July 31, 2012

Lughnasadh or Lammas

Tomorrow is August first, the approximate date of the ancient Irish festival of Lughnasadh, a celebration that marks the start of the harvest and the beginning of summer's warmth declining to winter's chill. It was most often celebrated by picking berries, climbing to hill tops and visiting sacred wells.
My family and I went berry picking yesterday, not as a celebration of Lughnasadh, but because this is the season to do it. Which, I guess, is why I am so attracted to the Wiccan holidays, they are still so connected to the natural cycles, and they don't require lots of sugar and plastic to celebrate.
MMMMmmmmmmm! We do love berries. We also like hiking up the mountains around Vancouver, but we may not do this for a few weeks, as this time of year is so busy. 
Visiting Sacred Wells seems kind of funny to me, but likely because I've always grown up with indoor plumbing, I imagine that Wells were important to home life, and that some would be known to provide special water (maybe cleaner, maybe sparkling, or maybe infused with some mineral.) I don't even know how I would attempt this if I were to even try, but it does make me pause and consider how much the role of Water has changed for Humans over the last century.

There are two other common activities to perform on Lughnasadh, baking bread and getting married.
The bread make sense to me, it all ties in to harvest, and abundance. At this time of year, grain is just starting to ripen, and hopes are high that the harvest will be plentiful. Baking bread now seems like an act of faith, that there will be much more of this to come.
This is a sensible time of year to throw a big party, the weather is nice and food is plentiful. So getting Married, or Handfasted now would ensure that the union begins well, without undue stress. But Wiccans also believe that, as this time of year is the peak of summer (ruled by male solar energy), and the beginning of the longer nights of winter (ruled by female lunar energy) this is a time in the cycle when the Sacred Masculine and Sacred Feminine are in balance, are getting married themselves you could say. 
Ahhh, I wish our lives today in these big glass cities could still be so connected to these natural cycles that continue to occur. 
In a personal attempt to celebrate this lovely season, I will share with you a wonderful and easy biscuit recipe. I've never had success raising yeasted breads. But these biscuits always come out wonderfully fluffy.

Biscuits for Lammas

1 cup whole wheat flour
1 cup white flour
2tbs baking powder
1/4 cup milk
3/4 oil
1/2tsp salt
1tbs honey

Preheat oven to 450 degree F. Mix together dough, do not over knead. Either drop onto a baking sheet, or roll out and use a cup or cookie cutters to get your desired shape. Bake for 10 minutes, or until golden.

Enjoy!


Tuesday, July 24, 2012

Garlic and The Winter Garden Cycle!

On July 10th we harvested our garlic. We got a huge haul this year: 150 heads, and I'm happy to say that ~100 of them are market worthy, big, beautiful and intact.  

Harvesting them has created a free bed in our garden (a pretty big one too!) It is way too late to sow summer vegetables, but a perfect time to start sowing winter vegetables. Kale is a classic winter vegetable that I have grown every single year, but this year I am experimenting with many more veggies, that, started now, can be harvested in the fall and even through the winter.
So far I've done the first sowing in only half the space I used for the garlic.  I've sown the Scallions, Turnips, Rutabaga, Kohlrabi and Radishes. And they've already come up. In this heat (our peak summer weather) it is really important that I keep them well watered. But they are growing so fast, I can tell that I will be eating them very soon. In two weeks I will do a second sowing in the garden which will involve Walla Walla Onions, and more Turnips, Radishes and Scallions. I plan to sow Arugula and Corn Salad in my containers upstairs so they are more easily accessible.

I'm so excited, especially for the Turnips, which I've recently discovered I LOVE boiled slightly in salty water (turn your water into broth after) and having their greens cooked in a tomato sauce. MMMMmmmm.


Sunday, July 22, 2012

Mint, the overlooked weed.

Mint propagates itself very easily. We got our mint plant by pulling a stem with a little root attached off of a plant growing in our alley. We planted it in our garden, and have divided it twice already. The tendency of the roots is to thatch underground until it has spread itself throughout the garden, prompting many to not even attempt to grow it at all. I think we should be welcoming it, it is one of the earlier things we can harvest through the year, and we can harvest it numerous times in a season. In fact, continual harvesting may be the best way to keep its growth in check, making the task of weeding into a task of harvesting.

Mint is delicious dried as a tea, but lately I have preferred it as a seasoning or even a vegetable. Try these three recipes, and tell me if you don't agree.

Strawberry Mint Smoothie
A power boost to any morning

2-3cups strawberries
1/2cup chopped mint
2 cups water or ice
1/4 cup honey
Juice from half a Lime

Blend together and enjoy immediately, garnish with a mint leaf.


Pasta with Mint, Peas and Pecorino 
Cheese
This is simply an amazing pasta to have for a sunday lunch in the spring

Pasta
Fresh green peas or Fava beans
Mint, chopped
Pecorino Cheese, grated
butter
Freshly grated pepper

For one serving, boil pasta in salted water.
In a small sauce pan, sautee 1/2c fresh peas or beans in 1 tsp butter until bright green
Drain the pasta, toss in the mint, cheese and pepper.
Top with the peas/beans and butter
Adjust amounts to serve more than just you.


Nettle Mint Phyllo Pies
Adapted from a recipe that appeared in Edible Vancouver, Mint and Nettle make a harmonious combination, however kale, spinach, collards or chard could replace the Nettle. Nothing, can replace the mint though.

2cups chopped blanched Nettles
1cup chopped mint
1 white onion diced
1/4 c feta crumbled
Phyllo pastry.
Olive oil

Combine the first 4 ingredients in a bowl, set aside. Find your happy place, then gently start to pry apart the Phyllo, oiling it as you go. Once you free up a sheet, place about 2tbs of filling onto one corner, and wrap and fold it until you have a triangle pocket. Google it if you don't find this too clear. Brush oil on each side and bake in a pre-heated 350 degree oven (that is Fahrenheit)

Enjoy!