Tuesday, September 25, 2012

Peaches!!!

This is harvest time. And for me it is the busiest time of the year.
I had a late night recently, where I canned some peaches in syrup. Big buys are always cheaper, talk directly to a farmer if you can, these were bought at the farm in the Okanagan, and all of these peaches cost $20. The snap lids for the jars cost $2.50, so all together I paid only $22.50 for 12 cans of organic peaches. I'm happy, since this is my two year olds favourite treat.

Peeling them and slicing them are probably the hardest part of the job, luckily my sister helped out.
The slices are placed in sterilized jars and I pour hot syrup on them (sugar dissolved in water, I make it light, 1cup sugar to 10 cups water.)
I let them process in my water bath canner for 40 minutes, and then let them cool overnight.
These jars are too high in demand and won't last long, but its worth it for me, I love doing this.

Tuesday, September 18, 2012

Campfire cooking

The Age of Petrol will not be over for many more years. But it is waning, and the Days of Cheap Oil Energy are probably firmly behind us. I was struck this winter, considering our family's emergency kit, by just how vulnerable we are in regards to fuel. In the city, there is actually lots of food around, especially dried food, and we store quite a bit of water. But we have no wood pile, and certainly no fire pit or wood stove, anyways. I imagine, should an earthquake (this region's flavour of disaster) knock out the power for many days, we would BBQ all our food, probably sharing fuel and grill space with our neighbours. If the power was out for a week or more, we may have to resort to building a fire pit and salvaging wood.
Sadly, it seems one of the victims of the Petroleum Age, is the widespread knowledge of how to cook over a fire. I admit massive ignorance in this department. I've almost exclusively had an electric element to cook with, occasionally using gas flame, but only handful of times have I actually used a wood fire to make my meal. This is very aberrant to history, where knowing how to manipulate a fire to optimally fry, roast and boil was probably mastered by most people before they turned ten. 
Here are the few times I have tried, and what I did. Try not to laugh.
Veggie burger and sausages on a grill with corn roasting in the husk just beside the coals. Pretty simple camping food. We used 2 by 4s to hold up the grill, with the intention of tossing them in the fire after.
It all turned out delicious, note the water on the one board, just to keep it from burning faster than we wanted it to. 
Another trip, another fire. Here we are again roasting corn in its husk (its great, it gets steamy but loses none of its flavour) and we also have cut up veggies wrapped in foil with garlic butter. This was a grill-less dinner.
This dinner, made on a beach in Haida Gwaii was a little bit more elaborate. We started with mussels we had gathered that afternoon, with a bit of tomato sauce and garlic butter.
 Then, while we were snacking on those, we sauteed some meat and started boiling water.
 Veggies and mushrooms joined the meat in that pan when the meat was almost done, no extra oil was needed.
And once the pasta was boiled, tomato sauce and buttery greens and a bit of wine were thrown in with the noodles.

Mmmm, I have to say that all these meals are among some of my favourites ever. I think maybe its just the pleasure of eating outdoors, with great scenery and surrounded by nature sounds. Or maybe it is the high heat of the flames and the added flavouring of the smoke? Who knows. I am looking forward to practicing this skill some more.

If you are going to have a fire soon, try these simple ideas. And please, share with me what you and your family cook out in the open.

Banana and Chocolate melt

1 banana per person
half a chocolate bar (go dark if you dare!) per person
foil

Cut the banana in half length wise, sandwich in broken pieces of chocolate, wrap tightly in foil and bake over or beside the coals. When steamy, open and eat the goo with a spoon, or over graham crackers or whatever you got that seems good.

Roasted Yam 

One Fat, Round Yam

Yams, or Sweet Potatoes can be roasted right in the coals, if you don't have foil don't worry, only the skin will blacken into charcoal, the insides will be cooked into a soft, moist consistency that you can spoon out onto plates or right into your mouth.


And of course, there are always the marshmallows. Obviously not the healthiest choice, but for one night around the fire with your friends and family, I think you'll be alright.

What kind of things do you cook over a fire?

Tuesday, September 11, 2012

Zucchini Time!

 Its that time of the year, where we are blessed to be drowning in Zucchini. I go down to the garden every other day and look for the little courgettes. And sometimes I realize I missed one, and instead, I harvest a giant Zucchini baby, like the one pictured above.
Having a glut of something in the garden is fertile ground for creativity in the kitchen. After we've had our fill of Zucchini bread, and Raw Zucchini noodles topped with Marinara sauce, and then Sauteed Zucchini tossed with garlic, parsley and parmesan over pasta noodles, I've discovered two more ways we like our summer squash.

Korean Zucchini and Shrimp Pancakes
Grate and drain one Zucchini, Salt it as you grate, to draw the water out, reserve that water for later.
Equal portions cooked baby shrimp
A few green scallions chopped
1 1/2 cup flour
1 egg
1tsp baking powder
Seasoning salt
Enough water or milk to make a batter (start with 3/4 cup)
Oil for you pan

Oil a pan and put it on med heat. Mix all ingredients together in a bowl, try to achieve a thin but not liquid batter. Once oil on pan is hot, spoon batter out into small puddles on the grill. Let cook for 3 or 5 minutes on the first side, or until golden, then flip and cook on other side. Repeat until all the batter is used up. This is hearty, and delicious served with rice, kimchi and korean sesame black beans.

A great Vegetarian version is to replace the shrimp with onions.

Zucchini Fennel Coconut Soup
2 Large Zucchini's chopped
1 Bulb of Fennel, finely diced
One Onion finely diced
Coconut oil, or just oil
2 Bay leaves
1tsp Celery seed
1tsp dried Basil
1 head of garlic
Broth, or the Reserved Zucchini juice from recipe above
1 can coconut milk
Fresh ground pepper
Salt to taste

Start with the oil and the celery seed, add the onion and the fennel. After about 5 minutes, add everything else, except the coconut milk. Simmer for 30 minutes or more, once you are almost ready to serve, add the coconut milk and bit more pepper and puree with a hand blender.

What do you make in these times of Zucchini Glut?

Tuesday, September 4, 2012

Butter Making!

Food Bloggers the world over have been playing with making butter from whipping cream for a few years now. How could I resist?

It is actually quite simple, and has a few nice benefits, one of them being that it really helps reduce your waste. Sadly, the tinfoil covered wax paper that covers most bricks of butter are not recyclable. But, here in Vancouver, you can buy organic whipping cream in these glass re-usable/returnable bottles, significantly reducing the amount of your waste, and it actually produces more organic butter than what you can buy in the store for the same price. There is one drawback though, which I will explain in a little bit.

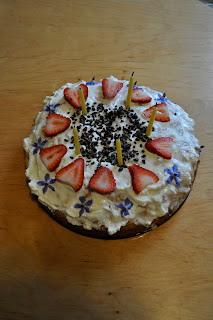
I've tried this a few times now, and find that the extra effort it takes really goes the distance when you have baking to do, like around your sister's birthday...
I start with the organic whipping cream, the colder it is, the faster it will whip up. I like to use my little Braun hand blender, with the whisk attachment at first.
I'm baking a cake, which I want to ice with whipping cream, so I remove the amount that I want for the top of the cake once it is whipped to the "soft peak" stage. And then I continue whipping.
At some point (maybe three minutes) the whipping cream becomes too thick for my whisk attachment, and it will stop.
This is when I change to the blender head. The Germans call these type of blender's "Stab and Stir,"  I think this name is really descriptive. I keep blending for another three minutes, approximately.
And then, the butter milk starts to separate. Its really amazing, all of a sudden you start to notice watery milk at the edges of you bowl, and then, BOOM, you have yellow butter and white butter milk.
Filter your butter milk out through a cloth, it could be a cheese cloth, but I just use a clean dish cloth.
Put all the butter into a pile and use your spatula, spoon or paddle to try to squeeze all of the butter milk out of it. Remember that disadvantage I mentioned at the top, well, if you don't get all the buttermilk out, which is REALLY hard, the butter will go bad within a few days. Maybe you can try salting it to preserve it for longer? Partly because of this, I will be using this method only for baking.
What I love about this method is that you can get 3 wonderful, organic baking ingredients from only one packaged consumer product. The Butter (in the measuring cup,) Butter milk, almost exactly one cup of each, and about a cup and a half of Whipping Cream. How nicely cost effective, but more importantly, what a waste saver.
And of course, I made a cake. Before I discovered this method, I didn't like making cakes from scratch, because I'd be required to buy buttermilk, something I'd only use a little of and probably waste the rest.

Something else I learned through this is, fresh buttermilk does not taste sour at all, it just tastes like milk.

Try it yourself, its fun, and in a way, you sort of feel more connected to our farmer/pioneer past.

Saturday, September 1, 2012

Apples to Applesauce...

Many of the old neighbourhoods in Vancouver have fruit trees that are often not harvested.
This lovely apple tree is in the yard of one of my friends, and they were too busy this year to pick them. I was very happy when she invited me to come harvest them, in exchange for a portion of the harvest.
I brought a few friends, and we used a tool called a apple picker. The tree is relatively small, and it was loaded, so it didn't take long for us to harvest quite a bit.
We got three bags. We divided them up between the owner and the pickers.
At home, and three weeks later (you got to love apples for their lasting qualities) I started to process them into applesauce. First washing them, then coring, and peeling the ones whose skins had lots of blemishes. I have been enjoying leaving most of the peel on the apples when making applesauce, its easier, and it gives the applesauce a heartier texture.
Putting the pots of apple chunks on the stove, I cook them down until they are juicy, soft and very steamy. I also added some sugar and lemon (less than a cup of each) to raise the acid to help ensure that they last longer in the cans.
After the apples are cooked and boiled, then I puree them with my blender. Hot puree bubbles too dangerously, and I have been burned before, so, now I make sure to cook them down first and then puree. Notice how much the apples did cook down, the two pots of apple chunks made one pot of apple sauce.
And into the jars and through the water bath canner they go. It was funny, usually you follow a recipe for a dozen jars and end up with 8 or 16 jars, here I followed no recipe, and ended up with exactly one dozen.

Are there trees in your yard that you can share with eager foragers? 
Or are you eager and want to harvest some of the wasted fruit in your town?

Check it out, there are programs connecting these two all over the world, and they always need new fruit and new pickers. 


The first time we used the applesauce was with Latkes, made with our garden potatoes. So, virtually a free meal. Cool.

Latkes

1/2 lb grated potatoes
1 egg
spinkling of flour
oil

Oil a cast iron pan and heat on med. Mix the grated potato with the egg and flour, and form into patties on the pan. Fry until cooked inside and browning slightly on the outside.

Enjoy!